java之SPI 发表于 2023-11-20 | 更新于 2025-06-14
| 阅读量:
java类的生命周期和加载过程 java类加载机制和类加载器 java之双亲委派机制
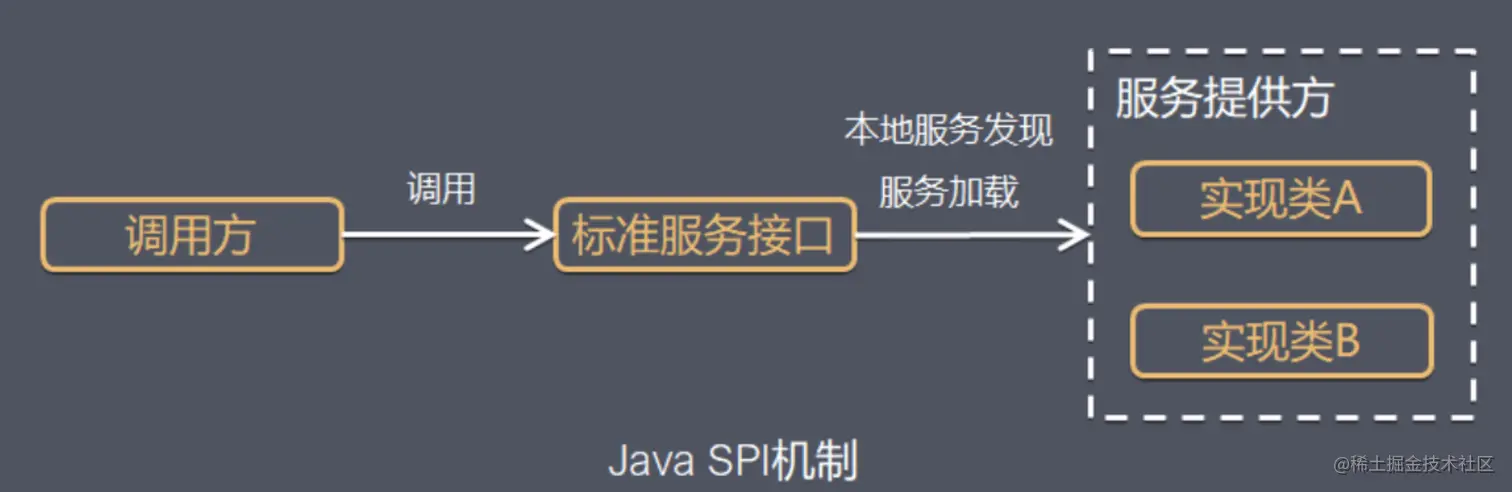
SPI 什么是SPI 服务提供接口(SPI,Service Provider Interface) 是 JDK 内置的一种「服务提供发现机制」,是 Java 提供的一套用来被第三方实现或者扩展的 API,它可以用来启用框架扩展和替换组件(可通过 SPI 机制实现模块化)。SPI 的整体机制图如下:
由服务的提供者提供接口的具体实现,然后在classpath下的META-INF/services目录下创建一个以服务接口命名的文件,文件中的内容则是 服务提供者实现累的全限定类名。 其他服务需要使用时,通过查找这个jar包的META-INF/services中的配置文件,根据文件中的具体实现类名,加载该类并实例化。java.util.ServiceLoader。
如何使用SPI 先来看一个例子,项目结构如下:
定义接口 定义接口: mqray.learn.cn.service.Search
1
2
3
public interface Search { List<String> findSource () ; }
自定义接口实现 提供两种实现: mqray.learn.cn.service.impl.CustomSearchA和 mqray.learn.cn.service.impl.CustomSearchB
1
2
3
4
5
6
7
public class CustomSearchA implements Search { @Override public List<String> findSource () { System.out.println("CustomSearchA" ); return new ArrayList <>(); } }
1
2
3
4
5
6
7
public class CustomSearchB implements Search { @Override public List<String> findSource () { System.out.println("CustomSearchB" ); return new ArrayList <>(); } }
新建配置目录 在当前项目的resource目录下创建META-INF/services文件夹mqray.learn.cn.service.Search,编码格式为UTF-8,其内容如下:
1
2
mqray.learn.cn.service.impl.CustomSearchA mqray.learn.cn.service.impl.CustomSearchB
使用 1 2 3 4 5 6 7 8 9 10 11 public class CaseTest { public static void main (String[] args) { ServiceLoader<Search> loaders = ServiceLoader.load(Search.class); Iterator<Search> iterator = loaders.iterator(); while (iterator.hasNext()){ Search search = iterator.next(); search.findSource(); } } }
最后打印程序输出如下:
1 2 CustomSearchA CustomSearchB
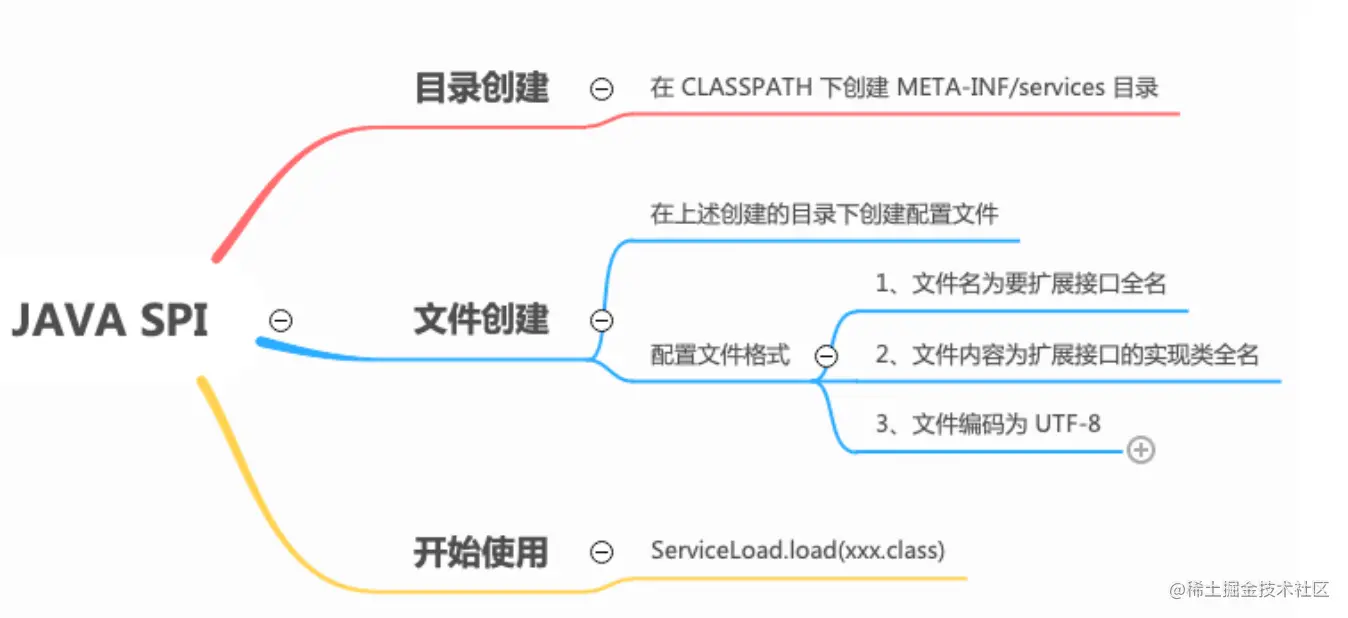
SPI使用总结 SPI的方法主要包含如下步骤:
提供服务接口和实现
定义服务接口 记为
自己作为服务实现者实现上述定义的接口
在当前项目的classpath下创建META-INF/services目录
配置自定义实现类
在META-INF/services目录下,新建文本,名为 定义的服务接口的 类引用地址
在 文本中新增自定义实现的 类引用地址
注意上述文本编码格式是UTF-8
使用ServiceLoader.load(Search.class)加载实现
SPI机制的实现原理
源码分析 1 2 3 4 5 6 7 8 public static void main (String[] args) { ServiceLoader<Search> loaders = ServiceLoader.load(Search.class); Iterator<Search> iterator = loaders.iterator(); while (iterator.hasNext()){ Search search = iterator.next(); search.findSource(); } }
第一行代码中,通过ServiceLoader.load(Search.class)完成 ServiceLoader的初始化
使用 Thread.currentThread().getContextClassLoader() 获取当前线程上下文类加载器,这里是AppClassLoader
使用 Reflection.getCallerClass() 获取调用类,以获取当前模块路径
调用 ServiceLoader 的类构造器
使用 checkCaller 检查当前调用者所在模块是否可以获取到指定的服务类型,这里是Search.class。同时检查模块中是否声明使用了该服务类型。
如果当前类加载器为null,则使用ClassLoader.getSystemClassLoader()作为类加载器
第二行中 调用 loaders.iterator() 返回一个迭代器,以延迟加载并实例化 可被当前服务加载程序 加载的服务提供者。
第三行调用while (iterator.hasNext()) 装载 服务提供者 到 LazyClassPathLookupIterator的nextProvider属性中。
第四行调用iterator.next()获取到当前的Provider<T>
第五行调用 Provider实现的findSource接口。
下面来拆解上述过程:
ServiceLoader.load() 1 2 3 4 public static <S> ServiceLoader<S> load (Class<S> service) { ClassLoader cl = Thread.currentThread().getContextClassLoader(); return new ServiceLoader <>(Reflection.getCallerClass(), service, cl); }
调用ServiceLoader的类构造器
1 2 3 4 5 6 7 8 9 10 11 12 13 14 15 16 17 18 19 private ServiceLoader (Class<?> caller, Class<S> svc, ClassLoader cl) { Objects.requireNonNull(svc); if (VM.isBooted()) { checkCaller(caller, svc); if (cl == null ) { cl = ClassLoader.getSystemClassLoader(); } } else { } this .service = svc; this .serviceName = svc.getName(); this .layer = null ; this .loader = cl; this .acc = (System.getSecurityManager() != null ) ? AccessController.getContext() : null ; }
checkCaller实现
1 2 3 4 5 6 7 8 9 10 11 12 13 14 15 16 17 private static void checkCaller (Class<?> caller, Class<?> svc) { if (caller == null ) { fail(svc, "no caller to check if it declares `uses`" ); } Module callerModule = caller.getModule(); int mods = svc.getModifiers(); if (!Reflection.verifyMemberAccess(caller, svc, null , mods)) { fail(svc, "service type not accessible to " + callerModule); } if (!callerModule.canUse(svc)) { fail(svc, callerModule + " does not declare `uses`" ); } }
注意到ServiceLoader中有如下属性:
1 2 3 4 5 6 7 private Iterator<Provider<S>> lookupIterator1;private final List<S> instantiatedProviders = new ArrayList <>();private Iterator<Provider<S>> lookupIterator2;private final List<Provider<S>> loadedProviders = new ArrayList <>();
loaders.iterator() 这里由于iterator方法的返回类型是Iterator<S>,它是一个接口,所以在ServiceLoader#iterator的实现中,返回的是 Iterator 的实现类
1 2 3 4 5 6 7 8 9 10 11 12 13 14 15 16 17 18 19 20 21 22 23 24 25 26 27 28 29 30 31 32 33 34 35 36 37 38 39 40 41 42 public Iterator<S> iterator () { if (lookupIterator1 == null ) { lookupIterator1 = newLookupIterator(); } return new Iterator <S>() { final int expectedReloadCount = ServiceLoader.this .reloadCount; int index; private void checkReloadCount () { if (ServiceLoader.this .reloadCount != expectedReloadCount) throw new ConcurrentModificationException (); } @Override public boolean hasNext () { checkReloadCount(); if (index < instantiatedProviders.size()) return true ; return lookupIterator1.hasNext(); } @Override public S next () { checkReloadCount(); S next; if (index < instantiatedProviders.size()) { next = instantiatedProviders.get(index); } else { next = lookupIterator1.next().get(); instantiatedProviders.add(next); } index++; return next; } }; }
上述代码在 return之前调用newLookupIterator
1 2 3 4 5 6 7 8 9 10 11 12 13 14 15 16 17 18 19 20 21 22 23 24 25 private Iterator<Provider<S>> newLookupIterator () { assert layer == null || loader == null ; if (layer != null ) { return new LayerLookupIterator <>(); } else { Iterator<Provider<S>> first = new ModuleServicesLookupIterator <>(); Iterator<Provider<S>> second = new LazyClassPathLookupIterator <>(); return new Iterator <Provider<S>>() { @Override public boolean hasNext () { return (first.hasNext() || second.hasNext()); } @Override public Provider<S> next () { if (first.hasNext()) { return first.next(); } else if (second.hasNext()) { return second.next(); } else { throw new NoSuchElementException (); } } }; } }
这里的layer定义是:private final ModuleLayer layer; 用以定位providor。如果使用classloader定位providor则为null。ServiceLoader的两个属性值赋值:
1 2 Iterator<Provider<S>> first = new ModuleServicesLookupIterator <>(); Iterator<Provider<S>> second = new LazyClassPathLookupIterator <>();
Iterator<Provider<S>>接口的实现。
接下来,调用来到第三行,while循环遍历Iterator.hasNext这里实际上是调用lookupIterator1.hasNext()。而它则是在newLookupIterator()的返回中定义的实现。ModuleServicesLookupIterator#hasNext()和LazyClassPathLookupIterator#hasNext()
1 2 3 4 @Override public boolean hasNext () { return (first.hasNext() || second.hasNext()); }
这里是短路逻辑,里面比较有意思,似乎有类加载器双亲委派的应用。下面具体来看:
LazyClassPathLookupIterator 1 2 3 4 5 6 7 8 9 10 11 12 13 14 15 16 17 18 19 20 21 22 23 24 25 26 27 private boolean hasNextService () { while (nextProvider == null && nextError == null ) { try { Class<?> clazz = nextProviderClass(); if (clazz == null ) return false ; if (clazz.getModule().isNamed()) { continue ; } if (service.isAssignableFrom(clazz)) { Class<? extends S > type = (Class<? extends S >) clazz; Constructor<? extends S > ctor = (Constructor<? extends S >)getConstructor(clazz); ProviderImpl<S> p = new ProviderImpl <S>(service, type, ctor, acc); nextProvider = (ProviderImpl<T>) p; } else { fail(service, clazz.getName() + " not a subtype" ); } } catch (ServiceConfigurationError e) { nextError = e; } } return true ; }
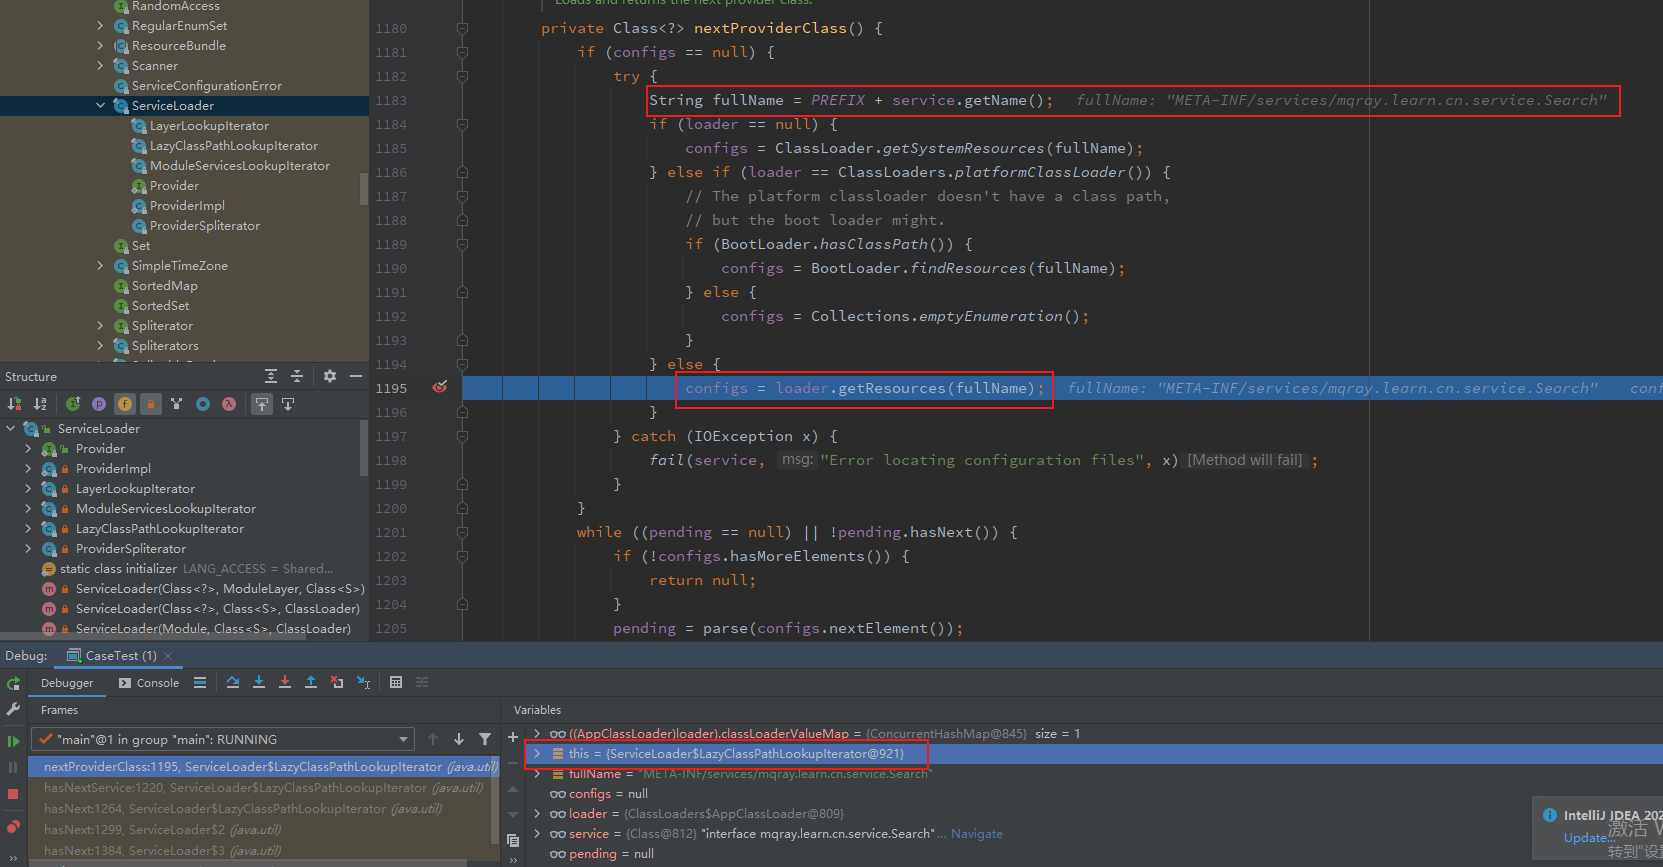
nextProviderClass的实现如下:PREFIX = "META-INF/services/"
1 2 3 4 5 6 7 8 9 10 11 12 13 14 15 16 17 18 19 20 21 22 23 24 25 26 27 28 29 30 31 32 33 34 35 36 private Class<?> nextProviderClass() { if (configs == null ) { try { String fullName = PREFIX + service.getName(); if (loader == null ) { configs = ClassLoader.getSystemResources(fullName); } else if (loader == ClassLoaders.platformClassLoader()) { if (BootLoader.hasClassPath()) { configs = BootLoader.findResources(fullName); } else { configs = Collections.emptyEnumeration(); } } else { configs = loader.getResources(fullName); } } catch (IOException x) { fail(service, "Error locating configuration files" , x); } } while ((pending == null ) || !pending.hasNext()) { if (!configs.hasMoreElements()) { return null ; } pending = parse(configs.nextElement()); } String cn = pending.next(); try { return Class.forName(cn, false , loader); } catch (ClassNotFoundException x) { fail(service, "Provider " + cn + " not found" ); return null ; } }
当前 ClassLoader 是AppClassLoader,走入这个分支逻辑loader.getResources(fullName)。
ClassLoader#getResources
1 2 3 4 5 6 7 8 9 10 11 12 13 public Enumeration<URL> getResources (String name) throws IOException { Objects.requireNonNull(name); @SuppressWarnings("unchecked") Enumeration<URL>[] tmp = (Enumeration<URL>[]) new Enumeration <?>[2 ]; if (parent != null ) { tmp[0 ] = parent.getResources(name); } else { tmp[0 ] = BootLoader.findResources(name); } tmp[1 ] = findResources(name); return new CompoundEnumeration <>(tmp); }
可以看到上述加载类的过程中,会先将加载请求委派递归的交给父类加载器。如果父类加载器不为null,则继续委派给父类加载器。如果加载器已经是BootClassLoader,则交由BootClassLoader加载。BootLoader.findResources(name)的执行过程: 其中BootClassLoader继承了BuiltinClassLoader,所以实际上是执行BootClassLoader#findResources。该方法会将此类加载器或此加载器的类路径上定义的模块中具有给定名称的所有资源以Enumeration<URL>的形式返回。这里会得到包含三个类加载器的加载配置。如图
1 2 3 4 5 6 7 8 9 10 11 12 13 14 15 16 17 18 19 20 21 22 23 24 25 26 27 28 29 30 31 32 33 34 35 36 37 38 39 40 41 42 43 44 45 46 47 48 49 50 51 52 53 54 55 56 57 58 59 60 61 62 63 64 65 66 67 @Override public Enumeration<URL> findResources (String name) throws IOException { List<URL> checked = new ArrayList <>(); String pn = Resources.toPackageName(name); LoadedModule module = packageToModule.get(pn); if (module != null ) { if (module .loader() == this ) { URL url = findResource(module .name(), name); if (url != null && (name.endsWith(".class" ) || url.toString().endsWith("/" ) || isOpen(module .mref(), pn))) { checked.add(url); } } } else { for (URL url : findMiscResource(name)) { url = checkURL(url); if (url != null ) { checked.add(url); } } } Enumeration<URL> e = findResourcesOnClassPath(name); return new Enumeration <>() { final Iterator<URL> iterator = checked.iterator(); URL next; private boolean hasNext () { if (next != null ) { return true ; } else if (iterator.hasNext()) { next = iterator.next(); return true ; } else { while (e.hasMoreElements() && next == null ) { next = checkURL(e.nextElement()); } return next != null ; } } @Override public boolean hasMoreElements () { return hasNext(); } @Override public URL nextElement () { if (hasNext()) { URL result = next; next = null ; return result; } else { throw new NoSuchElementException (); } } }; }
针对META-INF/services路径下的服务实现,会调用findMiscResource:
1 2 3 4 5 6 7 8 9 10 11 12 13 14 15 16 17 18 19 20 21 22 23 24 25 26 27 28 29 30 31 32 33 34 35 36 37 38 39 40 41 42 43 44 45 46 private List<URL> findMiscResource (String name) throws IOException { SoftReference<Map<String, List<URL>>> ref = this .resourceCache; Map<String, List<URL>> map = (ref != null ) ? ref.get() : null ; if (map == null ) { map = new ConcurrentHashMap <>(); this .resourceCache = new SoftReference <>(map); } else { List<URL> urls = map.get(name); if (urls != null ) return urls; } List<URL> urls; try { urls = AccessController.doPrivileged( new PrivilegedExceptionAction <>() { @Override public List<URL> run () throws IOException { List<URL> result = null ; for (ModuleReference mref : nameToModule.values()) { URI u = moduleReaderFor(mref).find(name).orElse(null ); if (u != null ) { try { if (result == null ) result = new ArrayList <>(); result.add(u.toURL()); } catch (MalformedURLException | IllegalArgumentException e) { } } } return (result != null ) ? result : Collections.emptyList(); } }); } catch (PrivilegedActionException pae) { throw (IOException) pae.getCause(); } if (VM.isModuleSystemInited()) { map.putIfAbsent(name, urls); } return urls; }
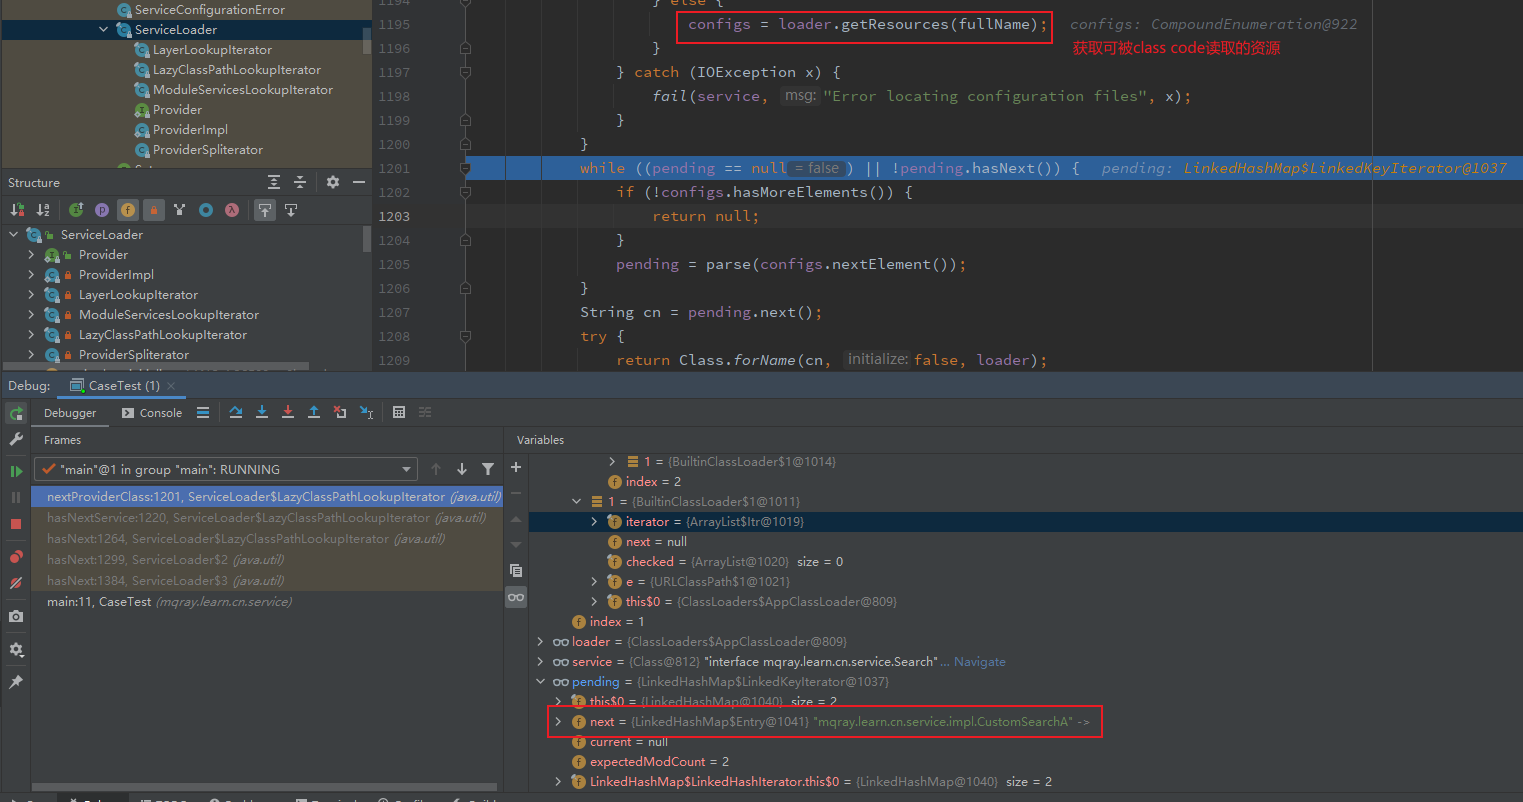
执行完findMiscResource后,回到LazyClassPathLookupIterator#nextProviderClass调用parse(configs.nextElement())
1 2 3 4 5 6 7 8 9 10 11 12 13 14 15 16 17 18 private Iterator<String> parse (URL u) { Set<String> names = new LinkedHashSet <>(); try { URLConnection uc = u.openConnection(); uc.setUseCaches(false ); try (InputStream in = uc.getInputStream(); BufferedReader r = new BufferedReader (new InputStreamReader (in, "utf-8" ))) { int lc = 1 ; while ((lc = parseLine(u, r, lc, names)) >= 0 ); } } catch (IOException x) { fail(service, "Error accessing configuration file" , x); } return names.iterator(); }
LazyClassPathLookupIterator#parse方法中传入了资源地址,这里是file:/D:/learn/java/target/classes/META-INF/services/mqray.learn.cn.service.SearchSearch的服务实现,并将服务实现的类限定名mqray.learn.cn.service.impl.CustomSearchA和mqray.learn.cn.service.impl.CustomSearchB保存在names中,最后返回它的迭代器。LazyClassPathLookupIterator#hasNextService循环遍历,导致nextProviderClass#在迭代中调用Class.forName(cn, false, loader)获取该 服务实现的 Clazz对象。
LazyClassPathLookupIterator#hasNextService:1220,再来看一遍代码:
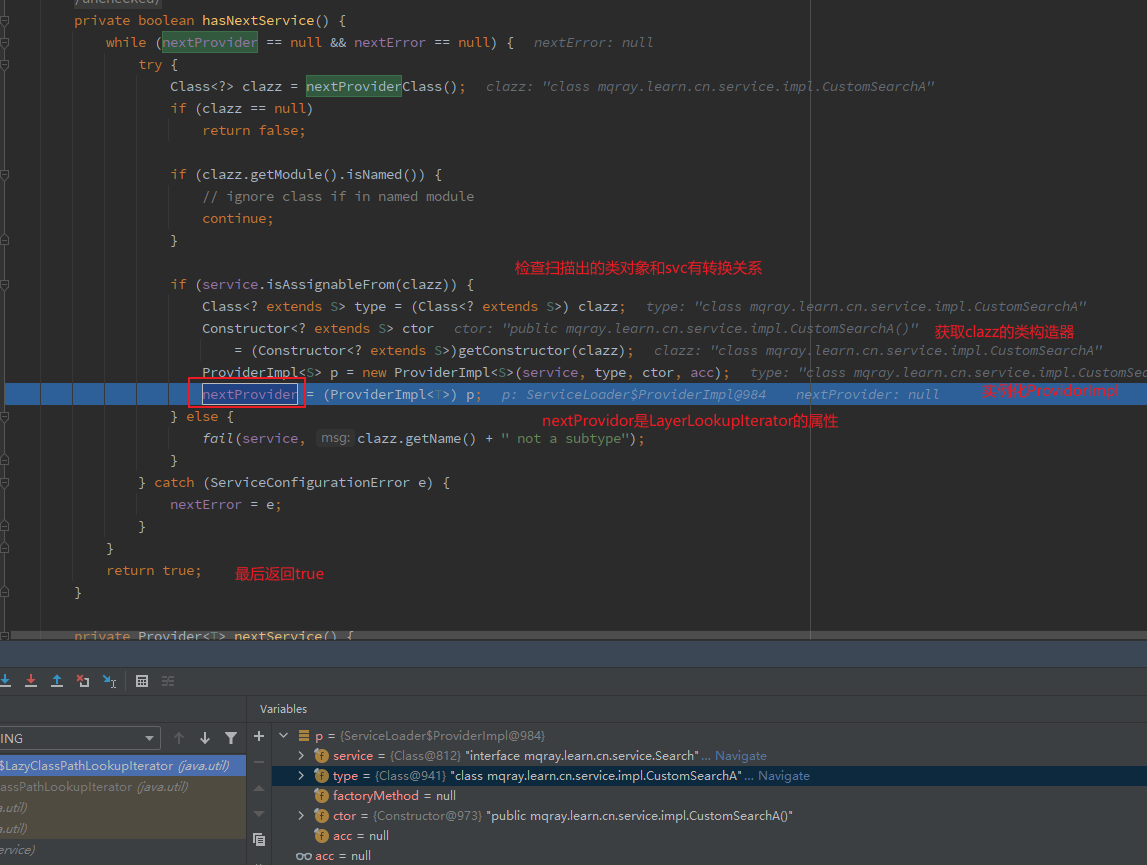
1 2 3 4 5 6 7 8 9 10 11 12 13 14 15 16 17 18 19 20 21 22 23 24 25 26 27 private boolean hasNextService () { while (nextProvider == null && nextError == null ) { try { Class<?> clazz = nextProviderClass(); if (clazz == null ) return false ; if (clazz.getModule().isNamed()) { continue ; } if (service.isAssignableFrom(clazz)) { Class<? extends S > type = (Class<? extends S >) clazz; Constructor<? extends S > ctor = (Constructor<? extends S >)getConstructor(clazz); ProviderImpl<S> p = new ProviderImpl <S>(service, type, ctor, acc); nextProvider = (ProviderImpl<T>) p; } else { fail(service, clazz.getName() + " not a subtype" ); } } catch (ServiceConfigurationError e) { nextError = e; } } return true ; }
可以看到,拿到Clazz对象后,会判断它和 服务提供接口 的继承、实现关系。然后调用:
1 2 3 4 5 6 7 if (service.isAssignableFrom(clazz)) { Class<? extends S > type = (Class<? extends S >) clazz; Constructor<? extends S > ctor = (Constructor<? extends S >)getConstructor(clazz); ProviderImpl<S> p = new ProviderImpl <S>(service, type, ctor, acc); nextProvider = (ProviderImpl<T>) p; }
上述代码做了什么事呢?
检查 service是否是clazz的父类或者接口
将clazz 转化为 S 的子类类型并赋值给 type
调用 getConstructor方法获取clazz的构造函数,并将其转化为S的子类的构造函数类型。
调用 ProviderImpl的构造方法创建ProviderImpl实例 p
将 实例 p 赋值给 LazyClassPathLookupIterator 的 nextProvider属性
主函数中程序继续执行到 Search search = iterator.next()newLookupIterator返回的Iterator实现:
1 2 3 4 5 6 7 8 9 10 @Override public Provider<S> next () { if (first.hasNext()) { return first.next(); } else if (second.hasNext()) { return second.next(); } else { throw new NoSuchElementException (); } }
接下来执行 LazyClassPathLookupIterator#next()
PS: 这里first=ModuleServicesLookupIterator、 second=LazyClassPathLookupIterator。
1 2 3 4 5 6 7 8 9 10 11 @Override public Provider<T> next () { if (acc == null ) { return nextService(); } else { PrivilegedAction<Provider<T>> action = new PrivilegedAction <>() { public Provider<T> run () { return nextService(); } }; return AccessController.doPrivileged(action, acc); } }
上述代码即根据acc的值来决定是以特权模式还是普通方式来执行nextService方法。
注意到在主函数iterator.hasNext()已经调用过hasNextService方法,如果有提供服务实现,在主程序调用iterator.next()时,nextProvider中已经存放了当前迭代器遍历到的服务实现,nextProvider置为null,返回当前遍历到的服务实现。
1 2 3 4 5 6 7 8 9 10 11 12 13 14 15 private Provider<T> nextService () { if (!hasNextService()) throw new NoSuchElementException (); Provider<T> provider = nextProvider; if (provider != null ) { nextProvider = null ; return provider; } else { ServiceConfigurationError e = nextError; assert e != null ; nextError = null ; throw e; } }
最后,走到主程序的最后一行search.findSource(),即调用获取到的服务实现完成业务操作。SPI的执行流程就完成了对第三方或者程序员自定义的服务实现的定义、加载和使用。ModuleServicesLookupIterator中的不再赘述。
SPI机制的应用 SPI机制应用较为广泛,包括
数据库驱动 JDBC DriveManager
日志库门面 Common-Logging
插件体系
Spring 中使用 SPI
这里参见2. java guide SPI机制详解 里面讲的比较详细。DBC DriveManager为例:
Java 定义服务提供接口(SPI),提供一个标准,如 java.sql.Driver。
具体厂商或框架来实现这个 SPI 接口,比如 me.cxis.sql.MyDriver。
具体厂商或框架创建配置文件,在 META-INF/services 目录下定义一个名字为接口全限定名的文件,如 java.sql.Driver 文件。文件内容是具体的实现名字,如 me.cxis.sql.MyDriver。
开发者引用具体厂商的 jar 包进行业务逻辑开发。1 2 3 4 5 6 7 8 9 10 ServiceLoader<Driver> loadedDrivers = ServiceLoader.load(Driver.class); Iterator<Driver> driversIterator = loadedDrivers.iterator(); while (driversIterator.hasNext()) { driversIterator.next(); }
SPI机制的缺点
不能按需加载
需要遍历服务的所有实现、实例化,然后遍历迭代器找到需要的实现
不需要使用的类也需要实例化,这些类较多时或者类实例化耗时
获取某个实现类时不够灵活
只能通过Iterator形式获取
不能根据某个参数来获取对应的实现类
多线程不安全:
多个并发线程使用ServiceLoader类实例是非线程安全的
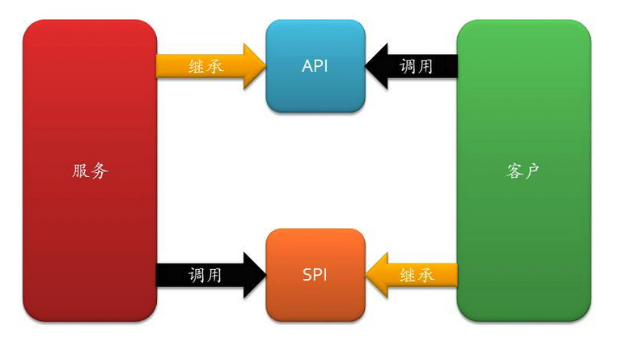
SPI 和 API 简而言之:API的实现在服务端,SPI的实现在客户端。
Spring SPI 在springboot的自动装配过程中,最终会加载META-INF/spring.factories文件,而加载的过程是由SpringFactoriesLoader加载的。从CLASSPATH下的每个Jar包中搜寻所有META-INF/spring.factories配置文件,然后将解析properties文件,找到指定名称的配置后返回。需要注意的是,这里不仅仅是会去ClassPath路径下查找,会扫描所有路径下的Jar包,只不过这个文件只会在Classpath下的jar包中。
两者的区别是:
JDK 使用的加载工具类是 ServiceLoader,而 Spring 使用的是 SpringFactoriesLoader。
JDK 目录命名方式是 META-INF/services提供方接口全类名,而 Spring 使用的是 META-INF/spring-factories
引用 1. SPI实现原理 2. java guide SPI机制详解


)